


After operating Dream Garden for a while, we started noticing a steady increase in visitors. But when we looked closely at our own grounds, something felt off. The landscape lacked a bit of aesthetic appeal, and it was clear we needed defined borders and proper planters to make the space feel professional.
My team and I sat down to figure out a fix, and my first idea was simple: buy pre-made flower planters to fill the space. Then we ran the numbers. The cost was astronomical, and there was no way our budget could cover it.
That’s when we worked out how to make concrete planters with paint buckets instead, using nothing but leftover bricks, a stack of “trash” paint buckets, and a bit of determination. Here’s exactly how we turned that trash into a stunning Star Garden for $50.
Key Takeaways
- Massive Savings: We built a full star-shaped garden bed with 10 concrete planters for about $50, versus an estimated $800 to $1,200 for a professional contractor.
- No Molds Needed: Empty paint buckets pressed into wet cement create instant planting holes—no wooden molds needed.
- Free Formwork: Loose bricks work as free, temporary formwork for DIY concrete garden edging.
- Efficient Mix: An 8:1 sand-to-cement ratio is plenty strong for garden borders.
- Fast Build: The whole project took just 2 days.
Why We Skipped Pre-Made Planters and Store-Bought Edging
To make a garden look professional, you need defined borders, structural shapes, and planters. Buying concrete edging or hundreds of pre-made pots would have easily cost us hundreds of dollars, and at Dream Garden, we simply didn’t have that kind of money.
But here’s what we did have:
- A massive pile of leftover bricks
- A stack of empty paint buckets (essentially “trash”)
- The determination to get our hands dirty

That combination turned out to be a cheap alternative to store-bought garden edging that cost us next to nothing.
Important Safety Disclaimer
Before you start mixing concrete, prioritize your safety. Dry cement powder contains silica and is highly toxic if inhaled. Wet cement is highly alkaline and can cause severe chemical burns to your skin. Always wear a well-fitting respirator mask, heavy-duty waterproof gloves, long pants, and safety glasses when handling dry cement and mixing wet concrete.
Materials for This DIY Concrete Garden Edging Project
| Material | Quantity | Purpose |
| Cement | 3 bags | The binding agent for our concrete mix. |
| Sand | 19 buckets | Mixed with cement for bulk and strength. |
| Leftover Bricks | 600–800 pieces | Used as a free, temporary formwork/mold. |
| Empty Paint Buckets | 10 buckets | The secret ingredient to create planting holes. |
How to Make Concrete Planters with Paint Buckets: The Secret Method
The hardest part of pouring DIY concrete planters is usually creating the negative space—the holes—where the flowers will eventually grow. Most guides tell you to build a complex wooden mold for that.
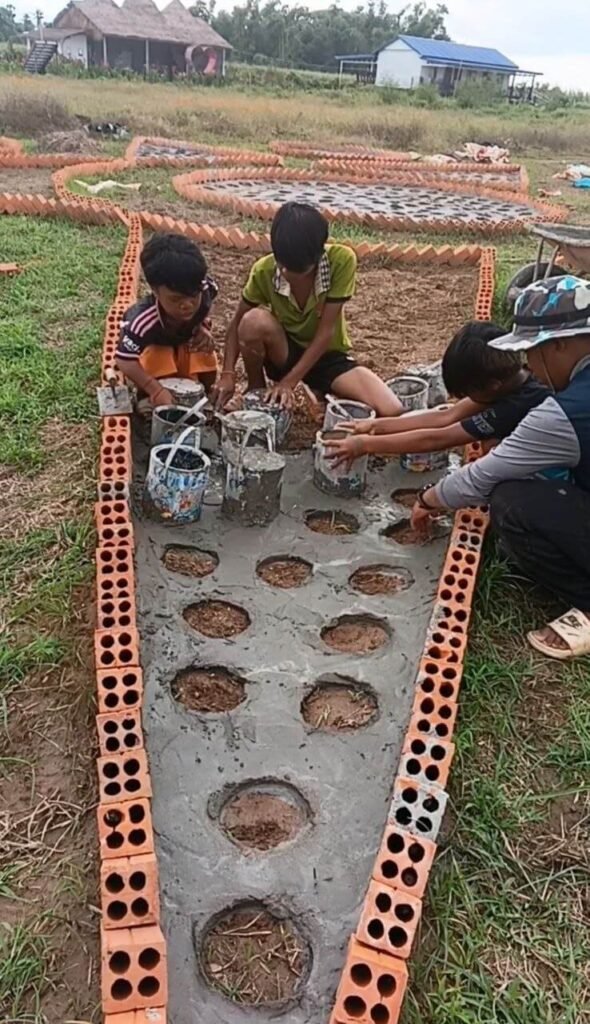
We didn’t have lumber lying around, but we did have a pile of empty paint buckets in storage. That’s where the idea came from.
What if we just pressed those empty buckets directly into the wet cement? Once the cement dries, you can pull the buckets back out, or leave them in as liners, and you’re left with instant, perfectly round planting holes. It was simple, completely free, and incredibly effective.
Step-by-Step: How to Build a Star-Shaped Garden Bed
Step 1: The Brick Mold (No Wooden Forms Required)
Instead of buying expensive lumber to build wooden formwork, we simply used loose bricks. We laid out 600 to 800 bricks to outline the large star points directly on the ground.
These bricks served as a sturdy barrier to hold the wet cement in place while it cured, making this a workable DIY concrete garden edging without wooden forms.
Step 2: Placing the Paint Buckets
This is where the magic happens. We arranged the 10 empty paint buckets in straight lines down the center of our brick molds. These buckets acted as our voids. Wherever a bucket sat, a beautiful flower would eventually grow.
Step 3: The Sand to Cement Ratio for Garden Borders
We used a highly economical mixing ratio: 8 buckets of sand to 1 bucket of cement.

Why so much sand? Because these are garden borders, not structural house pillars. They don’t need to support a roof; they only need to hold back soil. An 8:1 sand-to-cement ratio is more than strong enough for landscaping, and it saves a massive amount of cement—and money—in the process.
Step 4: Pouring the Concrete
We mixed the sand, cement, and water, then carefully poured the wet concrete into our brick mold, making sure to fill all the gaps around the paint buckets. We then smoothed the top surface with a masonry trowel for a clean, professional finish.
Mistakes We Made (And What You Should Avoid)
To save you some time and frustration, here are two things we learned the hard way during this build:
- Grease the Buckets: If you plan on removing the buckets after the concrete dries, coat the outside of the paint buckets with a thin layer of cooking oil or WD-40 before pouring the concrete. If you don’t, the concrete creates a vacuum seal against the plastic, making them incredibly difficult to pull out.
- Mind the Sun: Concrete doesn’t “dry”; it cures through a chemical reaction that requires moisture. Because we were working outdoors, the hot sun threatened to dry the top layer too fast, which can cause cracking. If you build this on a hot day, mist the drying concrete lightly with a garden hose a few times to keep it damp while it cures.
Custom Concrete Garden Planters: $50 vs. $800–$1,200
You might look at this and think, it’s just a cement planter. But to me, this project represents the true heart of entrepreneurship.
- Innovation: We repurposed actual trash (our paint buckets) to solve a landscaping construction problem.
- Massive Savings: A professional contractor would easily charge $800 to $1,200 for a custom concrete installation of this size. We did the whole thing for $50.
- Speed: The entire build only took 2 days.
If you’re wondering how much custom concrete garden planters cost when you hire it out, that $800 to $1,200 range is the quote we were working against, which is exactly why we built our own instead.
The Final Result
Once the cement was completely cured, we removed the brick formwork and pulled out the paint buckets. What remained was a flawless, solid concrete star shape with 10 perfectly round planting holes.

Now we’ve filled those spaces with rich soil and vibrant, beautiful flowers. The solid concrete surface prevents invasive grass and weeds from creeping in, while the unique star shape makes the entire garden look like it was designed by a high-end landscape architect—perfectly matching the romantic aesthetic of our How We Built a DIY Heart-Shaped Garden Arch for Under $40 just across the field.
Try This Cheap Alternative to Store-Bought Garden Edging Yourself
If you’re currently staring at the high costs of a landscaping project, take a step back and look at your own trash first. Do you have empty buckets lying around? Leftover bricks? Excess sand? You don’t always need to buy expensive, pre-made solutions.
That’s really the whole idea behind learning how to make concrete planters with paint buckets: sometimes all it takes is a little bit of cement mixed with a lot of creativity.
Frequently Asked Questions
What can I use instead of a wooden mold for concrete planters?
Empty paint buckets work well. Press them directly into wet cement, and once it dries you can pull them out or leave them in as liners, leaving perfectly round planting holes with no lumber or wooden formwork required.
What sand to cement ratio should I use for garden edging?
We used 8 buckets of sand to 1 bucket of cement. Garden borders only need to hold back soil, not support a roof, so this ratio is strong enough for landscaping while keeping cement costs down.
Is it really possible to build a concrete garden bed for $50?
In our case, yes. Using 3 bags of cement, 19 buckets of sand, 600 to 800 leftover bricks as formwork, and 10 empty paint buckets, our full star shaped garden bed came to about $50, versus an $800 to $1,200 quote for a professional installation of the same size.
How long does it take to build a concrete star garden bed like this?
Our full build, from laying the brick mold to pouring and smoothing the concrete, took 2 days.
Can leftover bricks really replace wooden formwork for concrete edging?
Yes. We used 600 to 800 loose bricks to outline the star points and hold the wet cement in place while it cured, which meant we didn’t need to build or buy any wooden forms.
